Also see the project page and the Github Repo

Why did I make a tip calculator?
While working on the v2 release of my Mini Macro Pad, I was having trouble managing state between different parts of the GUI.
After a bit of research, it seemed like the best path forward was to use the MVC, or Model-View-Controller, software architecture pattern to manage my app.
Before I could implement MVC for my Mini Macro Pad, I wanted to really grok MVC itself. I find that the best way to learn is by doing, so I decided to learn MVC by creating a tip calculator.
I had already created a tip calculator or two, so I had a starting place.
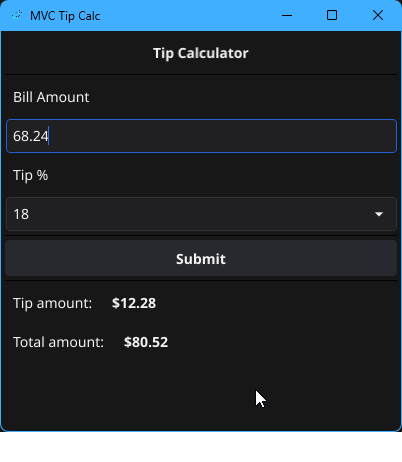
The tip calculator a basic form that calculates both the tip amount and total bill amount from the bill and tip %
Since my Mini Macro Pad is written in Go + fyne.io, I stuck with that.
What is MVC?

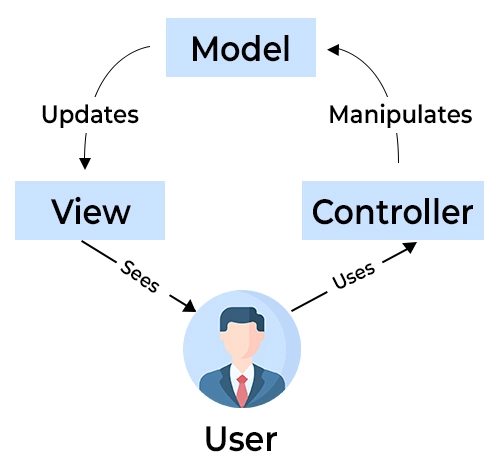
Model-View-Controller is a software architecture pattern that creates a separation of concerns, so each file in my codebase has a single purpose and a structure to follow.
You can compare this to having a single file that manages what the GUI looks like, what happens when you press a button, and also saving your changes.
- The Model is what the data looks like.
- The
tip percentandbill amountwill be in our Model.
- The
- The View is what the user will see (the actual form).
- The View should not actually update the Model when changes happen. Instead, it will have get/set functions that are managed by the Controller.
- The Controller is the bridge between the Model and the View.
- It will listen for events from the View, and will update the Model.
If you’d like to learn more about MVC, check out Derek Banas' tutorial. This was the video that really helped me understand what was happening.
Implementing MVC
Now that I had learned about MVC, I put it to use making the tip calculator. Note that the code snippets that you’ll see below aren’t full examples, if you want to see more details please check out the Github Repo.
The Model
For my tip calculator, I had two inputs:
- The
bill amount(how much your food costs) - The
tip percentage(how much you want to tip)
With those, I could calculate both the tip amount ($ to add), and the total amount ($ of bill + tip).
I needed to keep track of at least the first two numbers, and update the tip and total amount once one of those numbers changed.
The Model code:
 1type TipModel struct {
 2	billAmount float32
 3	tipPercent float32
 4}
 5
 6func (tm *TipModel) GetBillAmount() float32 {
 7	return tm.billAmount
 8}
 9
10func (tm *TipModel) GetTipPercent() float32 {
11	return tm.tipPercent
12}
13
14func (tm *TipModel) SetBillAmount(amount float32) {
15	tm.billAmount = amount
16}
17
18func (tm *TipModel) SetTipPercent(amount float32) {
19	tm.tipPercent = amount
20}
The View
My Tip Calculator View is a fyne.io widget with a few text boxes and some labels.
It also had a few important functions that the Controller used to control the view.
SetOnSelectTip()SetBillAmountEntryOnChanged()SetFinalTipAmount()SetFinalTotalAmount()
Snippet from the View code: (you should really see the src if you want to understand the fyne widget)
 1func (tv *TipView) GetBillAmount() (float32, error) {
 2	value, err := strconv.ParseFloat(
 3		tv.billAmountEntry.Text, 32
 4	)
 5	return float32(value), err
 6}
 7
 8func (tv *TipView) SetFinalTotalAmount(amount float32) {
 9	tv.finalTotalAmount.SetText(
10		fmt.Sprintf("%s%.2f", CURRENCY, amount)
11	)
12	tv.finalTotalAmount.Refresh()
13}
The Controller
The Controller is what connects the Model and View together. It tells the View what to do when a user selects a new tip percentage or enters a bill amount.
When that happens:
- The
bill amountand thetip percentagenumbers are obtained from the View using theGetBillAmount()andGetTipPercent()functions. - Both the
tip amountand thetotal amount(bill + tip) values are calculated - The View is updated with the new calculated values, and will
Refresh()to redraw the UI.
Some of the Controller code:
 1tc.TipView.SetBillAmountEntryOnChanged(func(s string) {
 2    tc.UpdateModelFromView()
 3    tc.CalcTipAndUpdate()
 4})
 5
 6func (tc *TipController) UpdateModelFromView() {
 7	// update model to current values
 8	billAmount, err := tc.TipView.GetBillAmount()
 9	if err != nil {
10		tc.TipView.SetErrorMsg("Bill amount must be a number.")
11		return
12	}
13	tipPercent, err := tc.TipView.GetTipPercent()
14	if err != nil {
15		tc.TipView.SetErrorMsg("Tip % must be a number.")
16		return
17	}
18	tc.TipModel.SetBillAmount(billAmount)
19	tc.TipModel.SetTipPercent(tipPercent)
20}
21
22func (tc *TipController) CalcTipAndUpdate() {
23	// calculate tip and total
24	finalTip := tc.TipModel.GetBillAmount() * (tc.TipModel.GetTipPercent() / 100)
25	finalTotal := tc.TipModel.GetBillAmount() + finalTip
26
27	// update view
28	tc.TipView.SetFinalTipAmount(finalTip)
29	tc.TipView.SetFinalTotalAmount(finalTotal)
30}
Bringing it all together
The last step to get the tip calculator working was to connect all the pieces together.
In my main.go file, I:
- Created an instance of the Model
- Created a fyne window
- Created a new View
- Used both of those references in my Controller to update everything
 1func main() {
 2	myApp := app.New()
 3	win := myApp.NewWindow("MVC Tip Calc")
 4
 5	tipModel := internal.NewTipModel()
 6	tipView := internal.NewTipView()
 7	tipController := internal.NewTipController(tipModel, tipView)
 8
 9	win.SetContent(tipController.TipView)
10	win.Show()
11	myApp.Run()
12}

…and with that, the tip calculator was completed!
With all this done, I had learned:
- How to separate my widgets into 3 parts
- How nice it was to have a pattern to follow when writing my code
- How to create a widget in fyne
See how this helped with my GUI Editor
Now that I learned a bit about MVC and was able to implement it myself, I felt confident enough to get started on my v2 release.
Read more about how that went in the blog post!
Check out the v2 release on Github!
If you want to read more of the code for this project, check out the Github Repo.
Thanks for reading!


Leave a comment!