

Before you read…
This is part 2 of my Mini Macro Pad project. I recommend reading my last blog post to read about how I 3D printed and programmed that.
What’s wrong with it?

I was happy to have a working Macro Pad and used it for about a year or so with only a few tweaks to the code. However, there was a problem: to change any of the Macros, you had to open up a code editor and edit a .yaml file.
While this worked, it was a bit of a pain to use, and changing anything on the fly was simply not possible.
I was talking to my friends about it, and they suggested making a WYSIWYG config editor. I had always planned on doing that eventually, but this was the push I needed to get started.
So it was decided - I had to make a GUI config editor. I wanted to make an interface similar to what you’d find in a Logitech or Razor keyboard driver.
Obviously not as complex, but enough to make changes on the fly.
The Features I Wanted
The main things I wanted to make easier were:
- Changing what the Macros did when you pressed a button (updating the Actions for a Macro)
- Moving the position of Macros using Drag-and-Drop (to place the buttons properly)
- Changing Metadata (like # of columns, and serial connection info)
The Editor’s Design
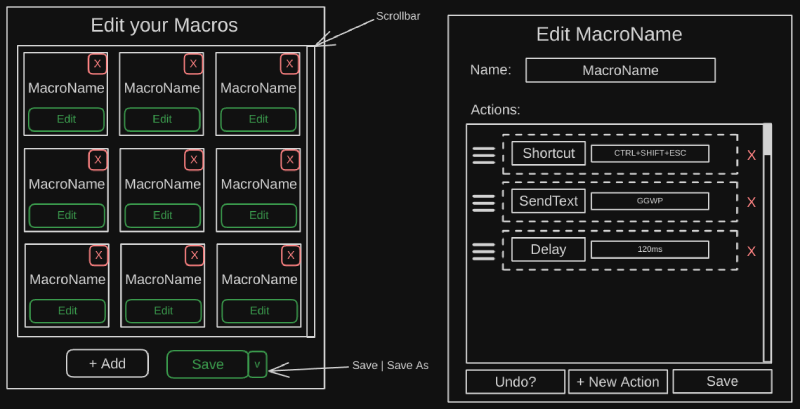
I started by designing a basic UI in Excalidraw so I could plan the layout.
Expanding my old GUI Code
My existing v1 code was pretty messy: my gui.go file was massive, it was getting hard to read, and I knew I needed to refactor it soon. I figured this could wait, at least until I had a basic config editor working.
So, I created a new test.go file, and got to work building my GUI to match my diagrams. I was able to get a Grid of Macros like before, with a Delete and Edit button at the bottom.
For this test, I just created a new window each time I needed to edit a particular section of the Config. (Like the Actions for a Macro, or the Metadata, etc.)
Once I got the layout looking okay, I copy/pasted my code into my gui.go file. After that was added, you could open up the editor by running the regular Mini Macro Pad window, then clicking Edit => Edit Config.
From there, you could Drag-and-Drop the Macros around, and click Edit to open another window to edit that specific Macro.
Fun with Drag-and-Drop
One of the challenges that I faced was getting the Drag-and-Drop to work properly. I discovered that a fyne widget can implement the Draggable interface. This was great! Luckily the library has a method to implement Drag-and-Drop - however, the documentation for this feature was auto-generated from the source code and lacked practical examples, making it hard to learn from.
Luckily, I could use VSCode’s Go to Definition (F12) function to see what a *DragEvent even is, and what kind of data it will give me. After playing with the code for a bit, I found out that it gave both the actual and delta position of the mouse in (X,Y) coordinates.
Here’s a screenshot of the doc:
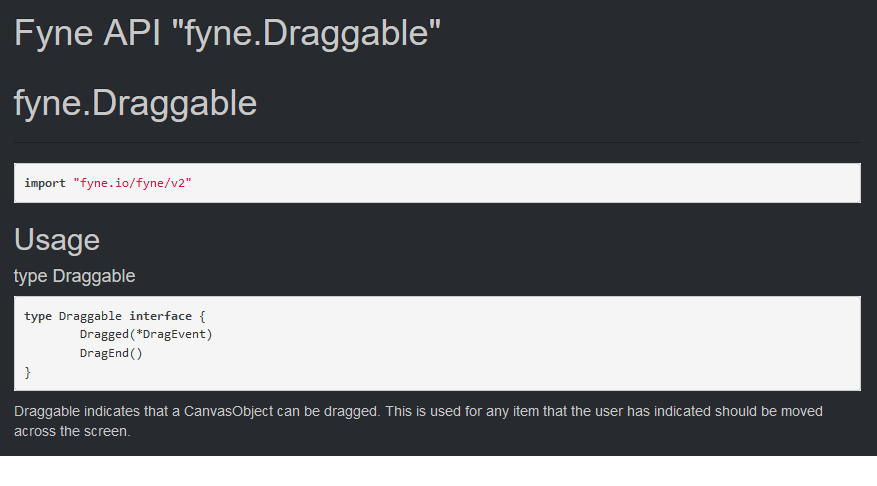
The Dragged() method is called every time the mouse moves while holding down the left mouse button (LMB), and the DragEnd() method is called when you release it.
Once I have the mouse position, I can determine which Macro GUI component is being clicked. I check the (X, Y) coordinates of each Macro, along with its width and height, to see if the mouse is within its bounds. If it is, I store the index of the dragged Macro in a draggedIdx variable and move the Macro to the mouse position every frame.
Since this calculation is computationally expensive, it only runs the first time you start dragging something.
When you release the mouse, I perform another check to see if you released it over a different Macro in the grid.
- If so, the positions of the two Macros are swapped.
- If not, the Macro returns to its original position.
Interested in the implementation? Check out the Drag and Drop widget code!
Having issues with data not syncing
Aside from the annoyance of opening too many windows, I was able to get everything visibly working. The problem was when I hit save - nothing was updated. When I looked at the .yaml config file, it was updated, but none of the other UI components were.
For example, when I’d update the name of a Macro in a new editor window, it wouldn’t sync to the regular window. One window would show the old value, while the other would show the new one.
The GUI library I’m using (fyne.io) is “pattern agnostic”, meaning it doesn’t care if you choose MVC, MVP, MVVM. You can even manage everything in a single file, as I was doing before.
Realizing that it’s time for a refactor

I knew the technical debt from gui.go was catching up to me, and I was finding it hard to follow the code I had just written.
So much spaghetti, so little time.
It became clear that I needed to rethink how to structure my code before writing more. My goal wasn’t just to get the data sync working; I also wanted to adopt best practices for how to write the code.
From my research, I found that the Model-View-Controller (MVC) pattern is the easiest to implement. MVC creates a separation of concerns, meaning each file in my codebase would have a single responsibility and a clear structure to follow.
This is a significant shift from having a single file managing everything—what the GUI looks like, the actions triggered by button presses, and saving changes (which is how I had been doing it).
So, I needed to learn MVC.
Learning MVC
I find it best to learn by doing, so to learn MVC I need to implement it myself. Just reading some docs or watching a Youtube video is great to get the gist of a concept, but I won’t truly grok it until I’ve used it.
I’ve written a blog post about my journey in learning MVC by creating a tip calculator! Please check it out to read more, but to summarize:
- The Model is where the data lives.
- e.g. The bill amount and the percent you’d like to tip.
- The View is what the user will see (the actual form).
- The View should not actually update the Model when changes happen. Instead, it will have get/set functions that are managed by the Controller.
- The Controller is the bridge between the Model and the View.
- It will listen for events from the View, and will update the Model.
Applying MVC to my Mini Macro Pad
Once I learned about MVC, I split up my widgets into 3 files starting with the smallest piece of the UI, the Action editor, and got to work.
I thought I’d finish up in a few weeks or so, but I kept finding more work to do. (You know how it goes.)
Here’s a (relatively) tiny snippet of the larger code base:
 1// Model
 2type Action struct {
 3	FuncName  string `yaml:"FuncName"`
 4	FuncParam string `yaml:"FuncParam"`
 5}
 6
 7// View
 8type ActionItemEditorView struct {
 9	widget.BaseWidget
10	funcSelect     *widget.Select
11	funcParamEntry *widget.Entry
12}
13func (v *ActionItemEditorView) SetAction(a *models.Action) {
14	v.funcParamEntry.SetText(a.FuncParam)
15	v.funcParamEntry.Refresh()
16
17	v.funcSelect.SetSelected(a.FuncName)
18	v.funcSelect.Refresh()
19}
20func (v *ActionItemEditorView) SetOnFuncNameChanged(f func(string)) {
21	v.funcSelect.OnChanged = f
22}
23
24// Controller
25func NewActionController(a *models.Action, v *views.ActionItemEditorView) *ActionController {
26	ac := &ActionController{
27		Action:               a,
28		ActionItemEditorView: v,
29	}
30	ac.ActionItemEditorView.SetOnFuncNameChanged(func(s string) {
31		ac.Action.FuncName = s
32	})
33  ac.ActionItemEditorView.SetOnFuncParamChanged(func(s string) {
34		ac.Action.FuncParam = s
35	})
36  ac.UpdateActionView()
37  return ac
38}
39func (ac *ActionController) UpdateActionView() {
40	ac.ActionItemEditorView.SetAction(ac.Action)
41}
Same MVC concept as my tip calculator, but with one MVC per widget.
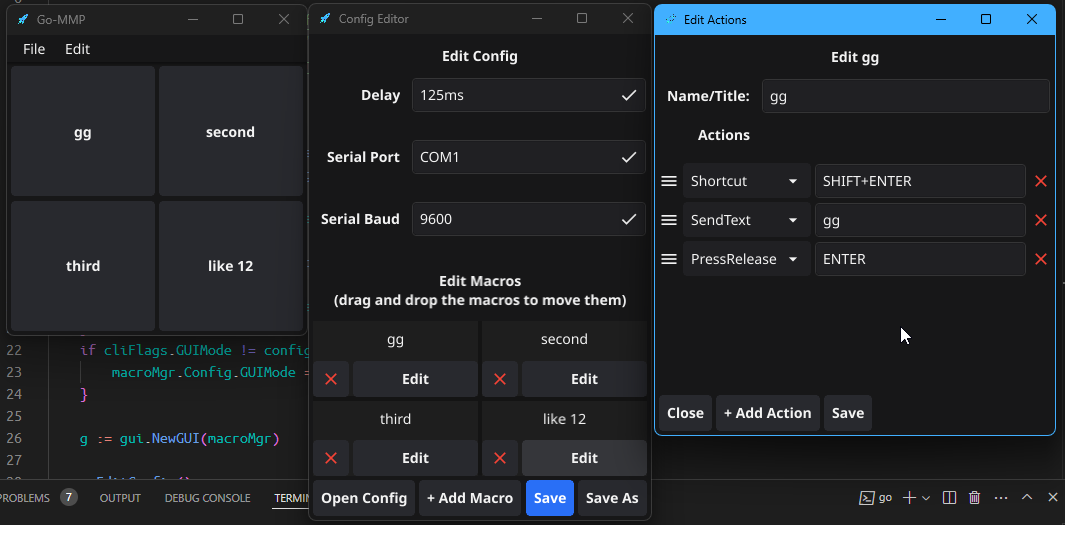
The finished Config Editor (v2 released)
I continued working on the project it was fully functional, overall it took about 2 months to complete the v2 release.
Here’s what the new GUI Config Editor looks like:
Just go to Edit > Edit Config, and drag-and-drop your macros into the correct positions
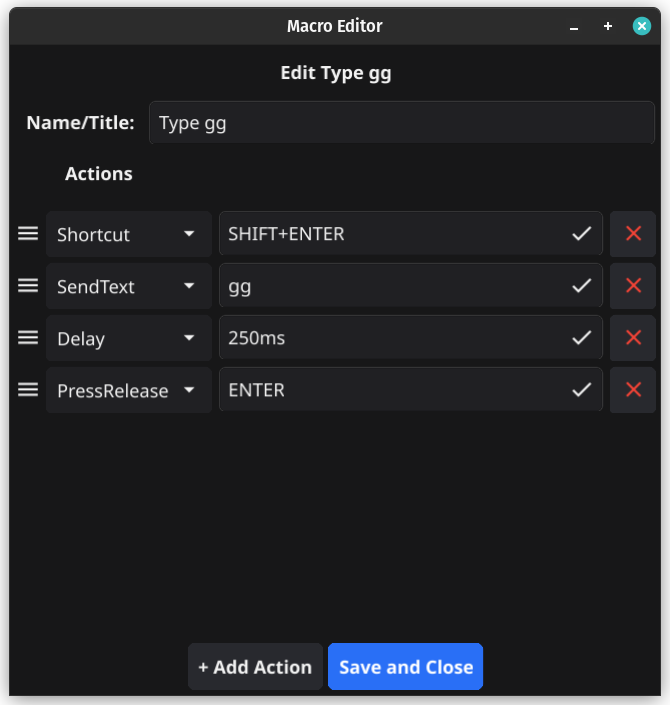
Here’s the “gg” Macro for example:
Before / After
Here’s what it took before to make changes to the config:
…and after:
Hopefully, you can see that it’s much easier to make changes, and I’m happy with all that I’ve learned in doing this.
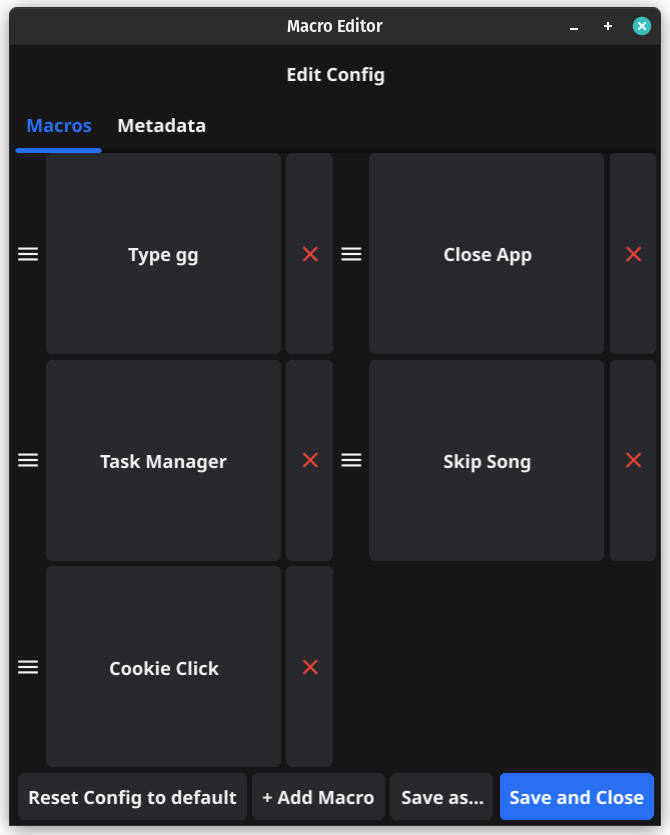
Final tweak
One last thing - After using my new editor, I noticed that the Drag-and-Drop functionality was annoying to use.
Specifically, when adding a new Action, it gets added to the bottom of the list. If you wanted to move this to the 2nd position, you can’t just insert it in position 2. Instead, you had to swap each item below pos 2 and make your way up.
This has been resolved in v2.0.1, and the before & after can be found there.
What’s next for v3?
I’ve made lots of progress in v2, so what’s left for v3? There couldn’t be more stuff, right? It’s done, right? Right?
Well, I’d want at least these features:
- Support using a Mouse + position in a Macro. (So you can click somewhere specific)
- Make it possible to Record a Macro, rather than just use the editor to make one.
- Make it possible to run a program / script from a keypress.
- Make a first time setup window
…there’s more, but you can see the rest on the Github Issues page.
Thanks for reading!
Leave a comment!